If you go to Dick Blick to buy a copper plate for etching, you'll find that in the shelves reserved for printmaking supplies, a 5" x 7" plate will set you back about $15. But I just discovered last week that if you go the craft supplies area, you can buy a thinner but perfectly usable 4" x 12" plate for half that amount. It's perfectly suitable for both etching and for drypoint. To test the plate, I drew a drypoint on it using the found images of Lucerne that I downloaded from the internet for my ongoing Lucerne project.
A drypoint is when you create the image by scratching lines into the metal plate, without using a resist layer or etching chemicals. You then ink, wipe and print the plate. I use a diamond point needle to create the lines, and to see how the drawing is 'developing', I would normally rub a little etching ink over the drawing with my thumb. But today, I decided to see whether I could scan the plate in order to see the lines better. This was the result of the scan:
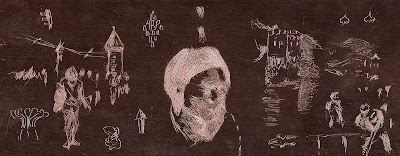
I then reversed the scan to get a 'positive' image:

This is a surprisingly good result. It's not exactly how it would look when inked and printed. The scanned lines are much sharper, compared to an actual drypoint, when the ink spreads a little out of the scratched lines to create the characteristic 'furred' look of the drypoint:
But as a way to get a quick test of how the drawing is going, and to gauge where you would need to scratch harder to get blacker lines, this is (for me, anyway) an exciting new discovery.
 Subscribe to Praeterita in a reader
A drypoint is when you create the image by scratching lines into the metal plate, without using a resist layer or etching chemicals. You then ink, wipe and print the plate. I use a diamond point needle to create the lines, and to see how the drawing is 'developing', I would normally rub a little etching ink over the drawing with my thumb. But today, I decided to see whether I could scan the plate in order to see the lines better. This was the result of the scan:

I then reversed the scan to get a 'positive' image:

This is a surprisingly good result. It's not exactly how it would look when inked and printed. The scanned lines are much sharper, compared to an actual drypoint, when the ink spreads a little out of the scratched lines to create the characteristic 'furred' look of the drypoint:
 |
| Drypoint by Whistler |
Subscribe to Praeterita in a reader